General sample preparation
The microscope will be magical with a well-prepared sample
1. Choice of the coverslip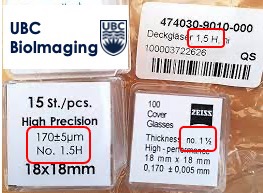
- In general, you should always the #1.5 coverslip (0.17mm thickness) as most microscope objectives are optimized for this thickness.
- Dishes and multi-well plates – for best results use dishes or plates with #1.5 coverslip bottoms. MatTek and ibidi are examples of companies that sell these products
2. Choice of your fluorophore(s)
- First, confirm the availability of compatible laser lines and excitation-emission filters for your chosen fluorophores, either in your lab or nearby.
- Second, when imaging live samples, try to work with fluorophores with longer wavelength excitation to reduce phototoxicity.
- Third, select bright fluorophores with long lifetimes to maximize signal and minimize photobleaching. The FPbase developed by Talley Lambert tool will help; https://www.fpbase.org/
- Finally, minimize any spectral overlap (cross-talk) between your fluorophores. The Fluorescence SpectraViewer from Thermo Fisher Scientific can be a valuable tool for assessing this.
3. Fixation
- Aldehyde fixatives, such as formaldehyde and paraformaldehyde, cross-link proteins and effectively preserve cellular morphology. They generally react more slowly than organic solvents, especially with thicker samples. A 4% formaldehyde solution for 10 minutes is a suitable starting point for mammalian cells.
- Glutaraldehyde, while offering superior preservation of cellular structure, induces strong autofluorescence and is thus primarily used for electron microscopy.
4. Mounting medium
- A mounting medium is essential for preserving the sample as well as enhancing image quality during microscopy. The mounting medium’s refractive index should closely match that of the immersion oil.
- A glycerol-PBS mixture (50-90% glycerol in 1x PBS, pH 8-9) is suitable for many fixed samples, including immunofluorescence and GFP-labeled specimens. An antifading agent is highly recommended.
- Several commercial mounting media are available, including (in no particular order): Fluoromount-G (Electron Microscopy Sciences), Aqua/Poly-Mount (Polysciences), ProLong, SlowFade, SlowFade Light (Molecular Probes), and Vectashield (Vector Laboratories). Note that Prolong Gold is not appropriate for use with fluorescent proteins (i.e. GFP, RFP, etc.), and Vectashield is not good for AlexaFluor 647.
5. Place sample on the coverslip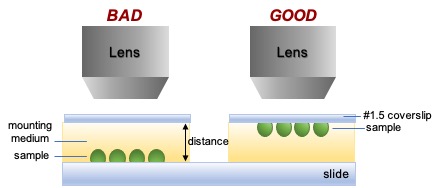
- Placement on the coverslip enables direct imaging of the sample, rather than imaging the sample through variable amounts of mounting/imaging medium.
- Most lenses are designed to image at the coverslip, not far from the coverslip. Thus, resolution may be degraded or the distance may be too great to focus.
- To mount the slide on the coverslip: place the coverslip on a lab bench, add mounting medium, angle the slide above the coverslip, and lower slowly until the coverslip mounts. This will minimize bubbles that refract light and cause artifacts.
6. Sealing the coverslips
- This is important to hold the sample in place, to prevent dryness, oxidation and hardening, and to preserve 3D information in the sample.
- After mounting, carefully wipe away any excess mounting medium. Then, seal the coverslips to the slide using either nail polish or melted wax. Ensure the nail polish has completely dried before imaging.
- Melted wax can be used when your samples are sensitive to chemical in nail polish and/or for quick sealing. Melted wax is in the heat block at the prep room of BIF.
- Loose coverslips can lead to the deposition of mounting medium onto the objective lens, hindering imaging and potentially damaging the objective.
Tips for users
- Start small with a minimally complex experiment.
- Turn on the environmental chamber or thermo plate to make the optimal imaging condition.
- Avoid short wavelengths that cause the most cellular damages.
- Acquire as few z slices as possible to obtain the information needed.
- Minimize the number of timepoints acquired. (consider the dynamics of the visualized event).
- Acquire fields of view that are sufficiently far apart that they are not exposed to light from an adjacent field of view.